

How to Install Under Cabinet Lighting: A DIY Guide
Why Under Cabinet Lighting Is the Kitchen Upgrade You’ve Been Missing
The best way to install under cabinet lighting depends on your skill level, your kitchen setup, and how “finished” you want the final result to look. Here’s a quick answer:
Quick Answer: Best Methods by Situation
| Your Situation | Best Method |
|---|---|
| Renter or beginner | Battery-powered puck lights (peel and stick) |
| DIY homeowner | Plug-in LED strip lights with cord hiders |
| Full kitchen remodel | Hardwired LED system with dimmer switch |
The three key steps for any install:
- Choose your light type (LED strips, puck lights, or light bars)
- Prepare the surface and plan your layout
- Connect power — plug-in, battery, or hardwired
Under cabinet lighting is one of the most impactful upgrades you can make in a kitchen. It brightens your countertops, makes food prep safer, and adds a polished, high-end look that overhead lights simply can’t deliver on their own.
Yet it’s one of the most overlooked steps in a kitchen remodel.
Whether you’re updating a dated kitchen in Albuquerque or finishing a full renovation with new cabinetry, getting the lighting right matters. A poorly lit countertop — especially with a reflective surface like Caesarstone or Cambria quartz — can undercut an otherwise beautiful space.
This guide walks you through every step, from picking the right fixture to hiding every wire.
Easy best way to install under cabinet lighting word list:
Choosing the Best Way to Install Under Cabinet Lighting
Before you grab your drill, you need to decide which system fits your home. In May 2026, the market is dominated by LED technology because it’s energy-efficient, stays cool, and lasts for decades. But “LED” can mean many things.
Comparing Your Options
When weighing the best way to install under cabinet lighting, consider these four main types:
| Light Type | Best For | Pros | Cons |
|---|---|---|---|
| LED Strip/Tape | Continuous runs | Even glow, very thin, customizable length | Requires connectors for corners |
| Puck Lights | Accent/Spot lighting | Creates “pools” of light, easy to install | Can create shadows between lights |
| Light Bars | Heavy task work | Sturdy, often have built-in diffusers | More visible/bulky under the cabinet |
| Rope Lights | Ambient/Mood | Very inexpensive, easy to “snake” | Low brightness, not great for tasks |
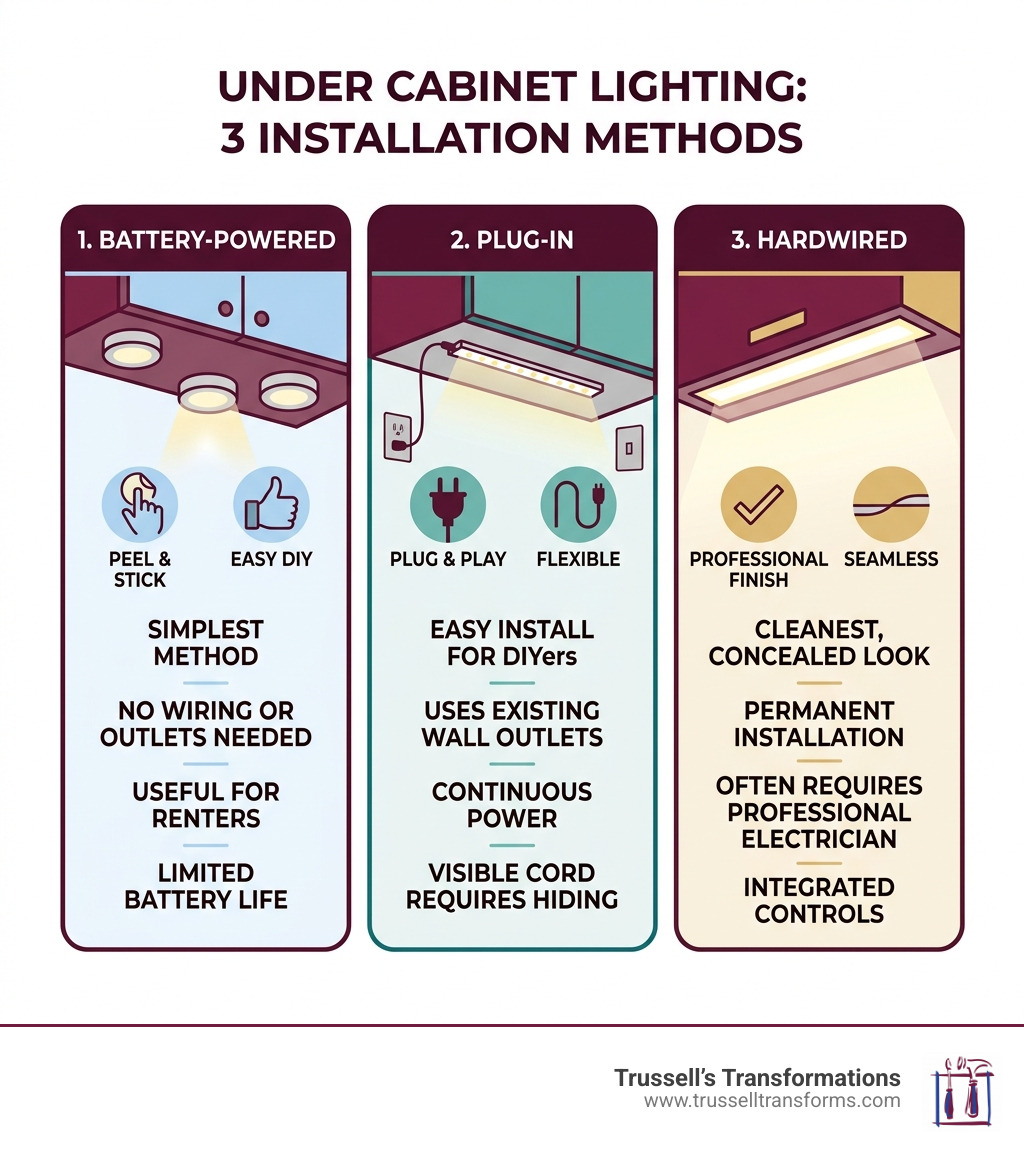
Power Sources: Plug-in vs. Hardwired vs. Battery
For a standard 10-foot kitchen run, project costs generally range between $40 and $250. Where you land on that scale depends on the power source.
- Battery-Powered: The ultimate “no-tools” solution. Perfect for renters in Rio Rancho or those who want a 5-minute upgrade. However, you’ll be swapping batteries frequently if you use them as primary task lights.
- Plug-In: These connect to your existing wall outlets. They offer consistent power without the need for an electrician. The challenge here is hiding the “tails” of the cords.
- Hardwired: This is the gold standard for a professional finish. It integrates directly into your home’s electrical system and is controlled by a wall switch. While more complex, it’s the best way to install under cabinet lighting during a full remodel.
Check out this Under-Cabinet Lighting Installation: Complete DIY Guide for a deeper dive into tools and maintenance. If you are also looking to refresh your bathroom, see our guide on The Best Vanity Cabinet Makers Near Me For A Bathroom Refresh.
Planning and Step-by-Step Installation
Planning is the difference between a kitchen that looks like a DIY project and one that looks like a showroom. Whether you’ve installed Durasupreme Cabinetry, Waypoint Living Spaces, Sollid Cabinetry, or Kitchen Cabinet Distributors, the installation process starts with a clean slate.

Step 1: Measure and Dry Fit
Measure the total length of your cabinet run. For light bars or strips, you generally want the fixture to be about 2 inches shorter than the cabinet width to ensure it stays hidden behind the face frame.
Step 2: Surface Preparation
Grease and dust are the enemies of adhesive. Even the best 3M tape will fail if the cabinet underside is dirty.
- Wipe the area with a degreaser.
- Follow up with a wipe of rubbing alcohol to remove any residue.
- Let it dry completely before applying any lights.
Step 3: Mounting the Lights
If you are using LED tape, peel the backing incrementally (about 6 inches at a time) to avoid the strip sticking to itself. For puck lights or bars, use the provided small screws, but be careful! Ensure the screws are shorter than the bottom panel of your cabinet so they don’t poke through into your storage space.
For more technical details on LED tape, see this guide on How to Install Above-Cabinet and Under-Cabinet LED Strip Lighting. And if you’re still in the middle of your build, don’t miss our tips on The Best Way To Install Cabinets Like A Pro.
The Best Way to Install Under Cabinet Lighting for Task Performance
If you actually use your kitchen for cooking (and not just for looking pretty), task performance is key.
- Brightness: You need 250-500 lumens per foot for effective task lighting.
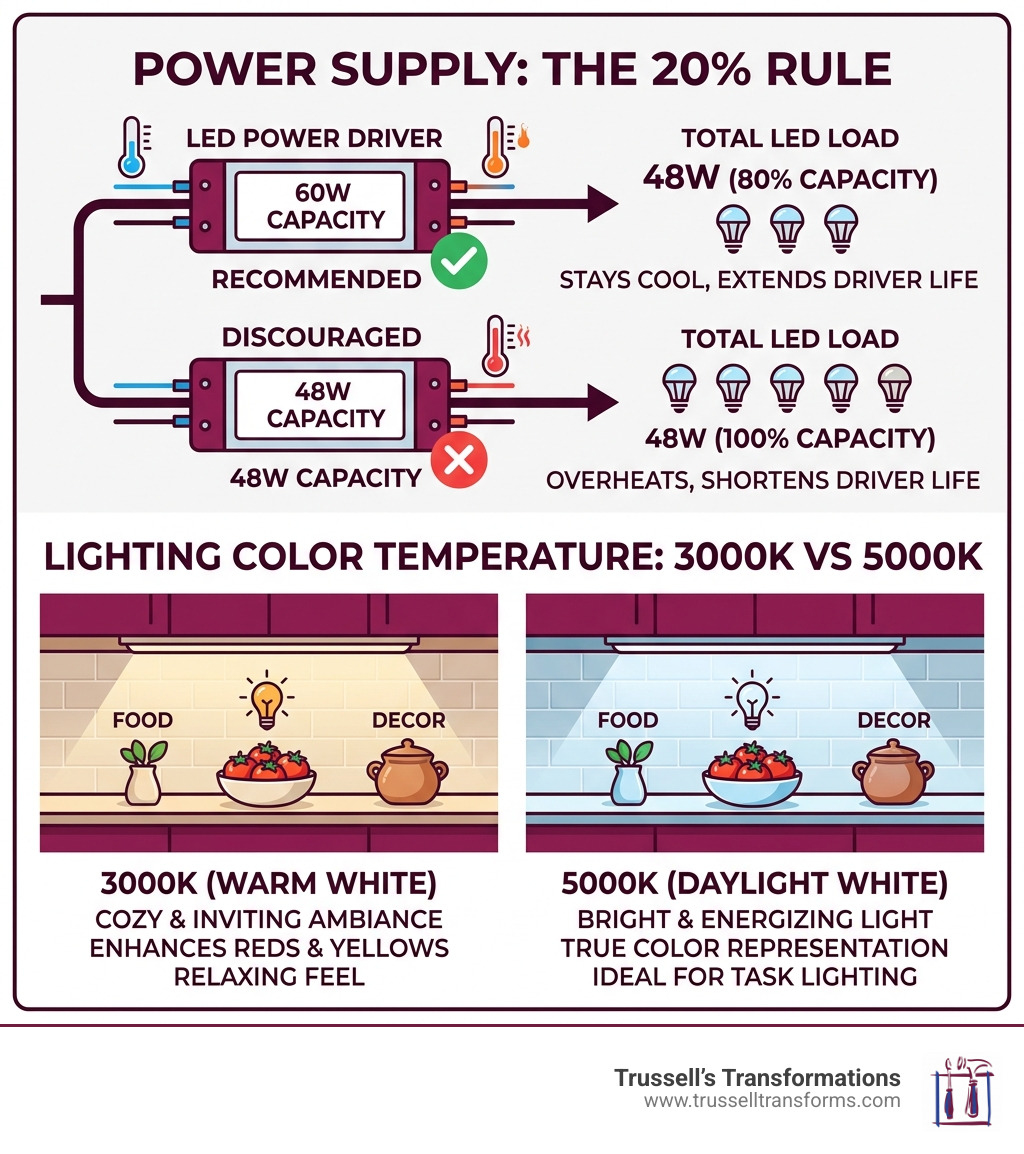
- Color Temperature: Aim for 3000K (warm white) to 5000K (cool daylight). 4000K is often the “sweet spot” for Albuquerque kitchens—it’s crisp enough to see what you’re chopping but warm enough to be inviting.
- Placement: Mount the lights toward the front-middle of the cabinet, just behind the face frame. This reduces shadows on the front of the counter where you do most of your work.
Advanced Hardwiring and Professional Integration
For those who want a seamless look without visible cords, hardwiring is the way to go. This involves tapping into a non-dedicated circuit (never use the dedicated appliance circuits for your microwave or fridge!) and running wire through the walls.

Safety First
If you aren’t comfortable with a voltage tester or cutting into drywall, this is the time to call in the pros. In Bernalillo County, electrical work must meet specific codes, including the use of GFCI outlets in wet areas.
- 12V vs. 24V: Most professional-grade LED systems use 24V because it allows for longer runs without “voltage drop” (where the lights at the end of the line look dimmer than the ones at the start).
- The 20% Rule: Your power supply (driver) should have a wattage capacity 20% higher than the total wattage of your lights. This keeps the driver cool and extends its life.
When working with high-end countertops like Caesarstone, Cambria, or Silestone from The Stone Collection, professional integration ensures the light reflects beautifully rather than creating blinding glare. For more on kitchen hardware, see How To Place And Install Cabinet Hardware Without Making Extra Holes.
The Best Way to Install Under Cabinet Lighting for Ambient Moods
Your kitchen isn’t just a workspace; it’s the heart of the home.
- Dimmability: Ensure your LEDs are labeled “dimmable.” You will need a compatible LED dimmer switch to avoid the dreaded flickering.
- CRI 90+: Look for a Color Rendering Index (CRI) of 90 or higher. This ensures that the colors of your food (and your beautiful new backsplash) look vibrant and true to life.
- Smart Integration: Modern systems can be linked to Alexa or Google Home, allowing you to set “scenes.” You might have “Cooking Mode” at 100% brightness and “Dinner Party Mode” at 20%.
Planning a full DIY vanity? Check out The Ultimate Guide To Diy Vanity Unit Installation.
Avoiding Common Installation Mistakes
Even experienced DIYers can run into trouble. Here are the “pro secrets” to avoiding a messy install:
- The “Hotspot” Problem: If you have polished quartz or granite, individual LED “dots” can reflect on the surface like a landing strip. The solution? Use aluminum extrusions with frosted diffusers. These channels house the LED strip and soften the light into a continuous glow.
- Adhesive Failure: Over time, the heat from the LEDs can loosen cheap adhesive. Using plastic mounting clips every 12 inches provides a mechanical backup to the tape.
- Visible Cords: Nothing ruins a renovation faster than a dangling black power cord. Use paintable cord hiders or drill small 1/2-inch holes through the bottom of the cabinet to route wires inside, tucked neatly into the corners.
- Flickering: This usually happens because of a loose connection or an incompatible dimmer. Always test your connections before the final “stick.”
Conclusion
Installing under cabinet lighting is a high-reward project that adds immediate value and functionality to your home. While the best way to install under cabinet lighting might be a simple plug-in kit for some, others will prefer the sleek, integrated look of a hardwired system.
At Trussell’s Transformations, we’ve spent over 25 years helping Albuquerque homeowners create their dream kitchens. From our showroom on Edith Blvd to your front door, we offer everything from premium cabinetry to expert installation by licensed contractors. If the electrical math or the thought of drilling into your new Waypoint cabinets feels daunting, we’re here to help. We even offer 0% financing to make your transformation even easier.
More info about cabinet services
How much does it cost to install under cabinet lighting in 2026?
In 2026, a basic DIY LED strip kit costs between $25 and $100. For a professionally installed, hardwired system in a standard-sized kitchen, expect to pay between $300 and $800, including labor and high-quality dimmable drivers.
Where is the best placement for under cabinet lights to avoid glare?
To avoid glare on reflective countertops like Silestone, place the lights about 1 to 2 inches behind the front lip of the cabinet. Pointing the LEDs slightly toward the backsplash or using a frosted diffuser channel will also help eliminate “hotspots” or reflections.
Should I hire a professional or DIY my kitchen lighting?
If you are using plug-in or battery-powered lights, it is a very manageable DIY project. However, if you want a hardwired system controlled by a wall switch, or if you need to navigate complex corners and multiple cabinet levels, hiring a licensed contractor is the safest and most reliable route to a professional finish.
Recent Comments